MHAを使ってZabbixをカジュアルに冗長化してみる
Onpremiseな環境でHAなDBクラスタを組んだり監視サーバを構築したりなんて作業は、ちょっと前であればごくごく当たり前のものだったけど、最近はクラウドやSaas/Paasをどれだけ活用して、よりビジネスの本流に集中しようというご時世。 でも、やっぱりOnpremise、どうしても必要な時はある。今のレールに頼り切るのもいいけど、やっぱり勘所はおさえておきたいので、カジュアルにZabbixをHAした時のことを備忘録しておきます。
やりたいこと
Zabbix serverを冗長構成にしたい。 Zabbix serverの稼働に必要なものはざっくり以下。
Zabbix serverをActive-Activeで稼働させてしまうと、データベースに二重で書き込みが行われてしまうので、Active-Standbyにしておく必要がある。障害時に手動切替なんて面倒、かつ二次障害起こしかねないので避けたい。MySQLもReplication組むだけでは弱いので自動フェイルオーバーくらいさせておきたい。そもそも監視サーバなので手間隙かけたくないし、むしろちょっとしたノード障害くらい放置しておきたい。
MySQLには5.6以降、GTID + failoverが標準搭載されているが、5.6出たばかりの時にGTIDのバグを幾つか踏んで痛い目にあったのと、上述の通りZabbix serverもまとめてHA化したいが幾つものクラスタウェア使って運用するのは腰が重い。カジュアルに一括りにしてよろしくやってほしい。
ということで、MHA。MySQLのReplicationのラグをよしなに埋めてくれる素敵なものにもかかわらず、挙動や構成が大変シンプル、拡張ポイントも多く、カジュアルにZabbixまで含めたクラスタウェアとして使えそうだったので採択決めました。
MHAいろは
MHAのアーキテクチャや仕組みは、詳しくは 公式ドキュメント を参照。要点をまとめるとMHA自体の責務は大きく以下。
- MySQLの監視
- Master/Slave ノードの監視
- Replicationステータス/各ノードのPOSチェック/遅延状況
- Binlog出力有無
- Read Only有無
- など
- Failover
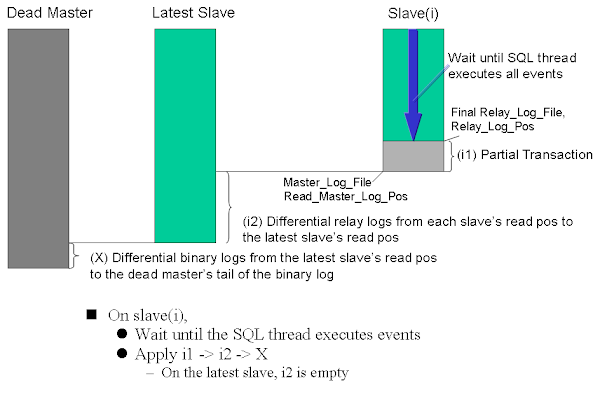
- 故MasterからのBinlog救出
- 昇格候補の選出
- 新Masterへの差分データ適用
- 新MasterへのRead only無効化
- 他Slaveへの差分データ適用
- 他SlaveのMaster host切替 (
CHANGE MASTER)
実システムでDBのSlaveを昇格させるには、これ以外に業務や環境に依存する様々な処理が必要になるが、MHAでは様々なフックポイントが用意されているので、適切な場所に拡張スクリプトを仕込めば、実システムにあわせたFailover作業を全自動で行うことができる。 拡張スクリプトはPerlスクリプトで実装する。MHAがPerlで実装されており、これが内部でcallされるため。詳しくはソースコード参照。
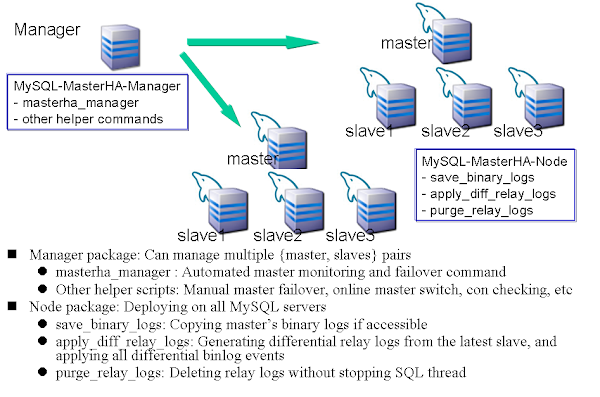
構成は、以下の図のとおり、MySQL監視プロセスとしてのMasterHA-Manager (masterha_managerプロセス) と、MySQL各サーバ上で動作するMasterHA-Nodeが必要となる。Managerは監視プロセスとなるため常駐させる必要がある。Nodeは、Failover時にManagerから適宜SSH経由で発行される幾つかのコマンドを処理するだけとなるので、MasterHA-Nodeの動作に必要なものをインストールしておくだけで良い。
 いずれも軽量なプロセスなので、好きなように構成組めば良い。例えばこんなところか。
松: 昇格用slaveと参照用DBを分ける
MHA manager [192.168.10.1]

Master [192.168.10.11, VIP: 192.168.10.10]
├── Slave (cadidate_master) [192.168.10.12]
├── Slave (no_master, Read only) [192.168.10.13]
└── Slave (no_master, Read only) [192.168.10.14]
竹: Slave 1機, Manager用のノードは別筐体
MHA manager [192.168.10.1]

Master [192.168.10.11, VIP: 192.168.10.10]
└── Slave [192.168.10.12]
梅: 最小構成
Master [192.168.10.11, VIP: 192.168.10.10]
└── Slave (w/ MHA manager) [192.168.10.12]
MHA自体は単体で動作し、あくまでクラスタの監視と、Failover時のリカバリとフックポイントを提供するのみなので、既に稼働中の環境でもねじ込める点も良い。非常に軽量な作りなので、新設/既設いずれも親和性が高いだろう。
MHAはRPMが公開されておりインストールは瞬殺で終わるので割愛。 Managerの他、MySQLが稼働している全サーバにMHA Nodeを入れる必要がある点に注意。 詳細は、Installation を参照。
MHAの拡張ポイント
MHAの設定ファイルで、以下のParameterを定義できる。Perlスクリプトのpathを記載することで、これらが呼び出されるようになる。 https://code.google.com/p/mysql-master-ha/wiki/Architecture#Custom_Extensions
代表的なものを紹介すると、
master_ip_failover_script
※詳しくは 公式ドキュメント を参照
Failover時の挙動を指定できる。代表的なものは、仮想IPの付け替え、クラスタウェアの再起動、アプリケーションの参照先DBの切替など。
以下の3地点で、これらの拡張Perlスクリプトがcallされる。 Failoverの瞬間だけ実行されるわけではない点に注意して実装すること。
MHA Manager calls master_ip_failover_script three times. First time is before entering master monitor (for script validity checking), second time is just before calling shutdown_script, and third time is after applying all relay logs to the new master. MHA Manager passes below arguments (you don't need to set these arguments in the config file).
要するに以下のタイミングで発火されるので、"command" パラメータで条件分岐するようなPerlスクリプトを仕込めば良い。その他、スクリプトに渡される引数もあわせて、以下に記載しておく。
- Checking phase : MHA-Manager起動時(--command=status)
- Current master shutdown phase : Masterサーバシャットダウン時(--command=stop or stopssh)
- New master activation phase : フェイルオーバー完了時(--command=start)
- --command=start
- --ssh_user=(new master's ssh username)
- --orig_master_host=(dead master's hostname)
- --orig_master_ip=(dead master's ip address)
- --orig_master_port=(dead master's port number)
- --new_master_host=(new master's hostname)
- --new_master_ip=(new master's ip address)
- --new_master_port(new master's port number)
- --new_master_user=(new master's user)
- --new_master_password(new master's password)
サンプルコードは以下 https://github.com/yoshinorim/mha4mysql-manager/blob/master/samples/scripts/master_ip_failover
shutdown_script
※詳しくは 公式ドキュメント を参照
オプションで指定するPerlスクリプトで、Failover後のshutdown処理を指定できる。Split brain防止のために使用する。例えば、IPMIやiDRAC, ilo経由, ESXi cli, その他Hypervisor経由の強制シャットダウン、電源OFFなど。 発火タイミングは、 master_ip_failover_script --command=stopssh|stop の直後。SSH reachableな場合とそうでない場合で挙動を変えられる。
サンプルコードは以下 https://github.com/yoshinorim/mha4mysql-manager/blob/master/samples/scripts/power_manager
例えば、ESXiの場合、vim-cmd で以下のようなコマンドを実行するイメージ。statusチェック, 電源OFF, 電源ONできるので、これを含むPerlスクリプトを仕込めば実現できる。
# VMID=`vim-cmd vmsvc/getallvms|grep zabbix-test01|awk '{print $1}'` && if [ -n "$VMID" ]; then vim-cmd vmsvc/power.getstate $VMID; fi
Retrieved runtime info
Powered on

# VMID=`vim-cmd vmsvc/getallvms|grep zabbix-test01|awk '{print $1}'` && if [ -n "$VMID" ]; then vim-cmd vmsvc/power.off $VMID; fi
Powering off VM:

# VMID=`vim-cmd vmsvc/getallvms|grep zabbix-test01|awk '{print $1}'` && if [ -n "$VMID" ]; then vim-cmd vmsvc/power.on $VMID; fi
Powering on VM:
MHA managerプロセスのバックグラウンド起動
普通に起動するとフォアグラウンド。公式ドキュメント はDaemonTools使っているが、Upstart等Linuxのサービス管理ツールでもシンプルに実現できるので、この辺りでデーモン化してあげると手軽で良いだろう。 MHA MnanagerプロセスはFailoverすると終了するライフサイクルになっているので、自動起動やrespawn処理はあまり入れないほうが良さそうな気がする。以下サンプル。
description     "MasterHA manager services"

chdir /var/log/masterha
exec /usr/bin/masterha_manager --conf=/etc/mha.cnf >> /var/log/masterha/masterha_manager.log 2>&1
pre-start exec /usr/bin/masterha_check_repl --conf=/etc/mha.cnf
post-stop exec /usr/bin/masterha_stop --conf=/etc/mha.cnf
起動/終了/ステータスチェックはこんな感じ。
- start masterha-manager
- status masterha-manager
- stop masterha-manager
MySQL インストール
詳細は割愛。 MySQL 5.6でも5.7でも動くぽいので、好きなモノを選べば良いと思う。 注意点は以下。
- MySQL
- MySQL 5.7の罠があなたを狙っている - Slideshare
- Semi Replicationは有効化
- Master - Slave間の欠損が限りなく0に近くなるので、Failoverが早くなる。
- ただし、レイテンシとのトレードオフで判断すること
- relay_log_info_repository=TABLE はやめておけ
- MHA利用時、これを入れていると以下のようなエラーが出た。relay_log情報はMHAがよろしく見てくれるので、my.cnfではあえて有効化しておく必要はなし。
Getting relay log directory or current relay logfile from replication table failed on
- relay_log_purge = 0
- read_only は set文で。my.cnfには書くな。
- 元のSlaveがMasterに昇格した時に、my.cnfに read_only = 1 がセットされていると再起動のタイミングで戻り障害を引き起こす可能性があるため危険。
Zabbix インストール
ようやくZabbix。インストールの詳細は例によって割愛。
ポイントは、冒頭で触れたとおりMHAでZabbixまで含めてクラスタ化するため、MySQLのMasterと同一サーバ上でZabbix serverを稼働させるようにすること。 Zabbix serverプロセスをPacemaker等、別の機構でクラスタ化しても良いのだが、実績上Zabbix serverプロセスが落ちる可能性よりもホストがポシャることの方が多かったので。監視サーバなので、という割り切りです。なので、設定は以下のような感じ。
- zabbix_server.conf
Zabbix web (Apache + PHP) は、複数Activeで動作可能ので上述のクラスタとはわけて考えて良い。 何人ものエンジニアが大量のグラフが貼られたスクリーンを定期リロードすることを考えると、むしろ別サーバにApache + PHP専用機並べてバランシングさせておきたいくらい。 なので、PHPからDBの接続はVIP経由でアクセスさせる。以下、Webの初期設定のポイントを列挙しておく。それぞれのWebサーバに対して設定行うこと。
- http://$HOSTNAME/zabbix/ にアクセス
- インストール画面が出てくるので進めていく
- DB接続情報は以下で入力
- Database Host: VIP
- Database User: zabbix
- Database Password: 設定したパスワード
- Test Connectionして接続確認
- Zabbix server Detailは以下で入力
- Host: VIP
- Name: 任意の名前 (環境が分かると良い)
- 確認ダイアログが出るので、間違いないか確認。
- これを全てのApache/PHPに対して行う (↑で生成された設定ファイル撒くでも構わない)
master_ip_failoverスクリプト for zabbix
最後の仕上げ。MHAで障害検知時は、MySQLの他、VIPとZabbix serverもセットでFailoverさせるようなスクリプトを用意しておく。あとは、/etc/mha.cnf の master_ip_failover に指定しておけば良い。 VIPの付け替えを行うのでARPキャッシュの更新を忘れないように。さもないと、フェイルオーバーしたのにつながらないなんてことのないように。 以下、サンプルです。
#!/usr/bin/env perl

#
#  If you wanna know about the paramaster, "master_ip_failover_script",
#  read the below document.
#
#  https://code.google.com/p/mysql-master-ha/wiki/Parameters#master_ip_failover_script
#
#  [Usage]
#  master_ip_failover_zabbix \
#    --virtual_ip=192.168.10.10/16 \
#    --orig_master_vip_eth=eth0 \
#    --new_master_vip_eth=eth0
#
#  [Description]
#  --virtual_ip            => Virtual IP / mask
#  --orig_master_vip_eth   => Device name that is attached virtual ip on origin master host.
#  --new_master_vip_eth    => Device name that is attached virtual ip on new master host.
#

use strict;
use warnings FATAL => 'all';

use Getopt::Long;
use MHA::DBHelper;

my (
  $command,        $ssh_user,         $orig_master_host,
  $orig_master_ip, $orig_master_port, $new_master_host,
  $new_master_ip,  $new_master_port,  $new_master_user,
  $new_master_password,
  $virtual_ip,  $orig_master_vip_eth, $new_master_vip_eth
);
GetOptions(
  'command=s'             => \$command,
  'ssh_user=s'            => \$ssh_user,
  'orig_master_host=s'    => \$orig_master_host,
  'orig_master_ip=s'      => \$orig_master_ip,
  'orig_master_port=i'    => \$orig_master_port,
  'new_master_host=s'     => \$new_master_host,
  'new_master_ip=s'       => \$new_master_ip,
  'new_master_port=i'     => \$new_master_port,
  'new_master_user=s'     => \$new_master_user,
  'new_master_password=s' => \$new_master_password,
  'virtual_ip=s'          => \$virtual_ip,
  'orig_master_vip_eth=s' => \$orig_master_vip_eth,
  'new_master_vip_eth=s'  => \$new_master_vip_eth,
);

exit &main();

sub main {
  # for debug
  print("---------- start master_ip_failover script ----------");
  if ( defined $command )             { print("  command => $command\n") };
  if ( defined $ssh_user )            { print("  ssh_user=s => $ssh_user\n") };
  if ( defined $orig_master_host )    { print("  orig_master_host => $orig_master_host\n") };
  if ( defined $orig_master_ip )      { print("  orig_master_ip => $orig_master_ip\n") };
  if ( defined $orig_master_port )    { print("  orig_master_port => $orig_master_port\n") };
  if ( defined $new_master_host )     { print("  new_master_host => $new_master_host\n") };
  if ( defined $new_master_ip )       { print("  new_master_ip => $new_master_ip\n") };
  if ( defined $new_master_port )     { print("  new_master_port => $new_master_port\n") };
  if ( defined $virtual_ip )          { print("  virtual_ip => $virtual_ip\n") };
  if ( defined $orig_master_vip_eth ) { print("  orig_master_vip_eth => $orig_master_vip_eth\n") };
  if ( defined $new_master_vip_eth )  { print("  new_master_vip_eth => $new_master_vip_eth\n") };

  # For current mastre shutdown phase
  # execute the below flow.
  #   1. unbind virtual ip from the origin master host.
  #   2. stop zabbix server process.
  if ( $command eq "stop" || $command eq "stopssh" ) {
    my $exit_code = 1;
    eval {
      `ssh $orig_master_host -o 'ConnectTimeout=5' '/etc/init.d/zabbix-server stop; /sbin/ip addr del $virtual_ip dev $orig_master_vip_eth'`;
      $exit_code = 0;
    };
    if ($@) {
      warn "Got Error while shutdown phase: $@\n";
      exit $exit_code;
    }
    exit $exit_code;
  }
  # For new master activation phase
  # execute the below flow.
  #   1. start zabbix server process.
  #   2. bind virtual ip on the new master host.
  #
  # Notice:
  #   * You don't need to unable the paramster "read_only = 1" and enable binary log,
  #     because they are already defined MHA common module.
  #
  elsif ( $command eq "start" ) {
    my $exit_code = 10;
    eval {
      my $ping_interface = join(".", $virtual_ip =~ /(\d+)\.(\d+)\.(\d+)\.(\d+)/ );
      `ssh $new_master_host -o 'ConnectTimeout=15' '/sbin/ip addr add $virtual_ip dev $new_master_vip_eth && /sbin/arping -U $ping_interface -c 3 && /etc/init.d/zabbix-server start'`;
      $exit_code = 0;
    };
    if ($@) {
      warn "Got Error while activation phase: $@\n";
      # If you want to continue failover, exit 10.
      exit $exit_code;
    }
    exit $exit_code;
  }
  elsif ( $command eq "status" ) {
    # do nothing
    exit 0;
  }
  else {
    &usage();
    exit 1;
  }
}

sub usage {
  print
"Usage: master_ip_failover --command=start|stop|stopssh|status --orig_master_host=host --orig_master_ip=ip --orig_master_port=port --new_master_host=host --new_master_ip=ip --new_master_port=port --virtual_ip=ip --orig_master_vip_eth=eth --new_master_vip_eth=eth\n";
}
以上で、カジュアルにZabbix serverが冗長化出来ます。 Zabbix serverプロセスが落ちたりVIP剥がれてもFailoverしないので、そのあたりは割りきって参考にして下さい。
まとめ
MHAはソースもPerlでそこまでボリューム多くないので気軽に読めちゃいます。 日本語の情報も多い(なにせ作者が日本人: 元DeNA, 現Facebookの松信さん)ので、他メンバーへの技術トランスファーも楽ちん、運用容易性が非常に高いのでおすすめです。
結局、MHAの宣伝みたいになってしまいました。。